Indicate MCP with VSCode
Connect VS Code to MCP Server
This guide details how to connect Visual Studio Code (VS Code) to our application using the Model Context Protocol (MCP). By connecting an MCP client, you enable AI agents (like GitHub Copilot) to directly interact with our API, retrieve context, and perform actions on your behalf using your authenticated credentials.
Current Support
- Protocol: HTTP (streaming)
- Authentication: Bearer
- Client: Visual Studio Code with GitHub Copilot
Prerequisites
Before you begin, ensure you have the following:
- Indicate Account with access to the MCP API.
- Visual Studio Code installed. You can download it from here.
- GitHub Account Required for GitHub Copilot. Sign up here
- GitHub Copilot Subscription (optional) - You need an active subscription (Individual, Business, or Enterprise) to access Premium Features and Models.
- API Credentials Obtain your Bearer token from the Indicate platform.
Step 1: Environment Setup
First, install VS Code and the GitHub Copilot extensions.
1. Install VS Code (if needed)
- Download and install VS Code from the official website.
- Launch VS Code once the installation is complete.
2. Install GitHub Copilot extensions
- Open VS Code.
- Go to the Extensions view by clicking the square icon on the left sidebar (or press
Ctrl+Shift+X/Cmd+Shift+X). - Search for and install the following extensions:
- Extensions to install:
- GitHub Copilot Publisher: GitHub
- GitHub Copilot Chat Publisher: GitHub
- VS Code Speech (optional) for Voice support. Publisher: Microsoft
3. Connect GitHub to VS Code
Once the extensions are installed, you must sign in to activate Copilot:
- Click the Accounts icon (person icon) in the bottom-left corner of the sidebar.
- Select Sign in with GitHub to use GitHub Copilot.
- Follow the browser prompts to authorize VS Code with your GitHub account.
- After sign-in, return to VS Code and confirm that Copilot shows as Enabled in the status bar.
Step 2: Configure MCP in VS Code
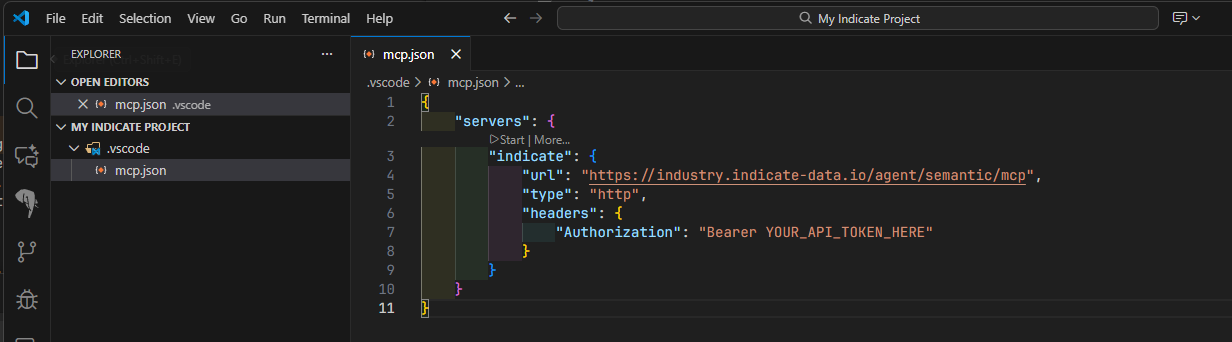
- In your project root, create a folder named
.vscode(if it doesn't exist). - Inside .vscode, create a file named
mcp.json. - Paste the following configuration into
mcp.json: - In your MCP configuration (
mcp.json), replaceYOUR_API_TOKEN_HEREwith your actual Bearer token.
{
  "servers": {
    "indicate": {
      "url": "https://industry.indicate-data.io/agent/semantic/mcp",
      "type": "http",
      "headers": {
        "Authorization": "Bearer YOUR_API_TOKEN_HERE"
      }
    }
  }
}
VS Code does not apply changes until the file is saved.
- Windows: Press
Ctrl+S - Mac: Press
Cmd+S
How to tell if a file is unsaved: look at the tab title at the top of the editor. If you see a white dot (circle) next to the file name (for example, mcp.json), the file is not saved and the configuration will not load.
Step 3: Start and Verify the Connection
After saving the configuration, verify that the MCP server has started correctly.
1. Check server status
- Copilot should automatically detect the new configuration.
- Open the Copilot Chat panel (speech bubble icon in the sidebar).
- Look for a notification or output in the terminal indicating an MCP connection.
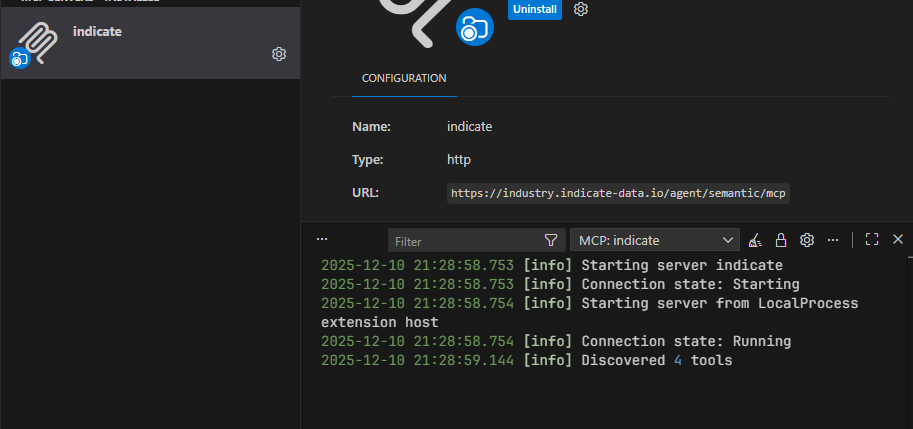
To verify manually via logs:
-
Go to Output on the bottom panel of VS Code.
-
In the dropdown on the top-right of the Output panel, select GitHub Copilot or MCP Server.
-
You should see a message similar to:
Found 1 server(s): indicate. Registered X tools, Y prompts, Z resources.
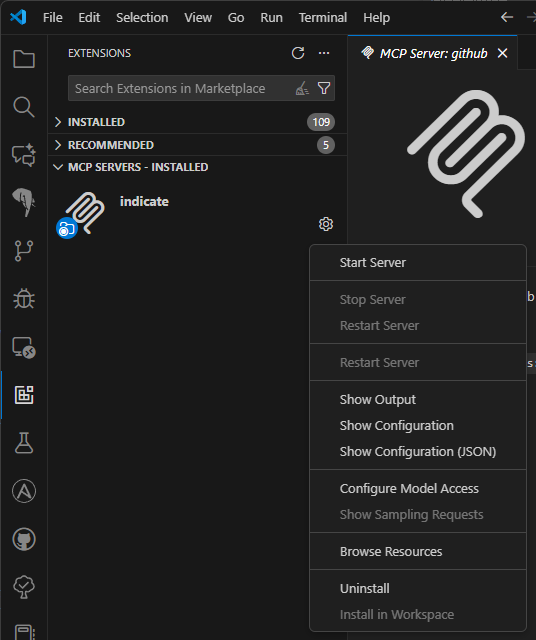
2. Restarting the server (troubleshooting)
If the server does not appear, or if you have just woken your computer from Sleep/Hibernate, you may need to restart the MCP server manually:
- Open the Copilot Chat panel.
- Click the Extensions on the left and look for the MCP Servers installed.
- If the server
indicateis visible but disconnected, click the Retry/Restart icon.
Step 4: Using the Agent
To interact with the API, you must switch Copilot into Agent Mode.
Switch to Agent Mode
- Open the Copilot Chat panel.
- At the bottom of the chat input, verify the dropdown is set to Agent (it may default to Chat or Copilot).
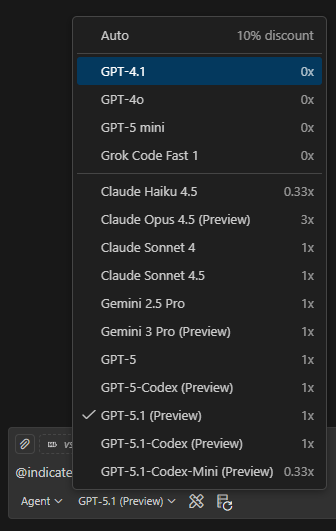
Select a model
- Ensure you have selected a capable model (for example,
GPT-4oorClaude 3.5 Sonnet) from the model picker on the right side of the chat input. - Premium models require a Copilot Pro or Business subscription.
Activating the tool
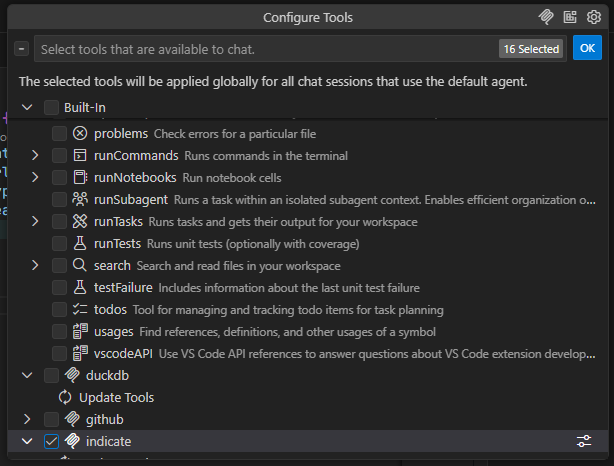
- In the chat input, click the Configure Tools button.
- Select
indicatefrom the list of MCP servers to ensure it is active (optionally deactivate all others to reduce noise if you are new to MCPs). - Type your query. For example:
Give me all reservations of Hotel XYZ for the last 2 months.
Recommended Extensions
To enhance your experience, especially for accessibility and localization, we recommend the following extensions from Microsoft.
-
VS Code Speech Enables voice-to-text for chatting with Copilot.
- Install: Search for VS Code Speech (Publisher: Microsoft).
- Usage: Click the microphone icon in the chat bar to dictate queries.
-
German Language Pack for VS Code Speech If you prefer speaking in German.
- Install: Search for German Language Pack for VS Code Speech (Publisher: Microsoft).
- Configuration:
- Press
Ctrl+Shift+P(Win) orCmd+Shift+P(Mac). - Type Configure Display Language to change the UI language.
- For speech specifically, go to Settings and search for
accessibility.voice.speechLanguage.
- Press
After installing language packs or major extensions, it is best practice to restart VS Code completely to ensure all components load correctly.
Troubleshooting & Quality of Life
Common issues
| Issue | Likely cause | Solution |
|---|---|---|
| Server disconnects | Standby / Hibernate | After opening your laptop, check the MCP status icon. If it's red/disconnected, use the Restart MCP Server button in the extensions menu. |
| "Tool not found" | Unsaved mcp.json | Ensure the white dot on the mcp.json tab is gone. Save the file and restart Copilot. |
| Premium models missing | New subscription | If you just upgraded to Copilot Pro, it may take a few minutes. Restart VS Code to refresh your license status. |
Quality of life tips
- Full screen chat: Drag the Chat tab from the sidebar into the main editor area to have a full-screen chat experience. This is helpful when analyzing long JSON responses from the API.
- Agent Mode default: If you primarily use MCP, try to leave the chat in Agent Mode so you don't accidentally send tool queries to the general chat model.
- Keyboard shortcuts: Familiarize yourself with VS Code keyboard shortcuts to speed up your workflow. For example,
Ctrl+P(Win) orCmd+P(Mac) opens the Quick Open dialog to quickly navigate files.